ESCO-TDS1200Ⅱ IR Maintenance
−Bakeout−
Installation of Insulation Jackets
❶ Turn OFF the SEM (Secondary Electron Multiplier) and filament of the Quadrupole Mass Spectrometer (QMS) via the control software.
❷ Turn OFF the main QMS power from the touch panel interface.
❸ Disconnect the power cable and communication cable connected to the QMS controller block.
❹ Loosen the mounting screws using a hex wrench (Allen key) and remove the QMS controller module.
❺ Verify that the chamber temperature sensor is correctly positioned and securely mounted.
❻ Affix the dedicated protective covers onto each structural viewing port window.
❼ Remove the upper thermocouple signal feedthrough connector.
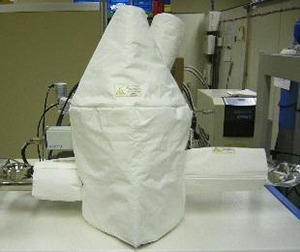 Insulation jacket
❽ Mount the physical thermal insulation jackets.
There are two insulation jackets: one for the main process chamber and one for the specimen transfer mechanism.
The insulation jacket for the main chamber should be slipped over the body from the front side of the instrument, wrapped towards the back, and secured utilizing the top and rear Velcro fasteners.
Proceed with extreme caution along the back side to prevent physical collisions with the main chamber vacuum gauge sensor (IG) or the Turbo Molecular Pump (TMP) due to restricted clearances.
Baking Criteria Settings

❶ Configure the baking criteria on the touch panel interface by setting either the total target baking duration or the specified automatic completion date/time.
❷ Press the start button to initiate the operation.
❸ The bakeout starts with the above operations, and the system is heated up to the configured setpoint temperature.
❹ When the set duration or specified completion date/time is reached, the power output to the heater elements is automatically cut off.
Post-Bakeout Processing
❶ Wait for the hardware temperature to drop natively until it is close to room temperature.
❷ Remove the thermal insulation jackets, reinstall the QMS controller module, reconnect all cabling back into position, and restore each part to its original state.
Rotary Pump (RP) Oil Exchange Procedure
We recommend performing a complete pump oil exchange once per annum.
❶ Safely stop the instrument exactly as detailed in the instruction manual.
❷ Confirm that the primary Rotary Pump (RP) physical block has fully cooled down to a safe working temperature.
❸ Remove the quick-disconnect clamps and corrugated metal line connection blocks.
❹ Open the main oil filling port cap.
❺ Position a suitable waste oil catch basin safely underneath the exit point to avoid spilling, and then open the drain valve. Proceed with care, as the pump oil will discharge rapidly.
❻ Once the fluid has completely evacuated from the reservoir, close the oil drain valve securely.
❼ Pour fresh pump fluid into the oil filling port until the liquid volume matches the specified
capacity line.
❽ Close the oil filling port cap firmly, and reinstall all components in the exact reverse order.
Safety Precautions
●Since the spent oil may contain highly toxic substances, personnel MUST wear protective safety glasses and robust oil- and chemical-resistant gloves throughout the procedure.
●Lay down heavy-duty protective floor sheeting underneath the chassis prior to pump extraction or handling to fully contain any fluid droplets or scattering.
●Immediately after stopping the RP, the internal oil may be extremely hot, posing a severe risk of thermal burns.
●Dispose of spent chemical fluids strictly via approved hazardous waste disposal networks.
●Never use any fluids other than the specialized lubricants officially supplied by ESCO or approved OEM manufacturer genuine oils. Alternative fluids pose significant failure risks to high-vacuum seals.
●The pump block is an extremely heavy object. Exercise proper lifting protocols to prevent catastrophic drops or personal injury.
●All service actions and replacement work must be handled exclusively by trained, authorized personnel thoroughly familiar with the procedure.
